Showing posts with label green living. Show all posts

2 December 2014

Let's Make a (totally free) Wreath


Wreaths are beautiful! And I made this one completely for free. Its December, so you should totally give it a go. It is extremely simple and really customisable, you can use whatever you have to hand.  All the plants I used are from my garden, and the decorations are from my regulars christmas decorations. Wreaths make pretty good gifts too; I'm planning on making another one for my Mum. You can use them as a table centre piece with a huge white candle in the middle or just hang it on your door! This is the very first wreath I have ever made and I am so unbelievably proud of how it turned out. 

All you'll need is:

         - The Foliage* - A pliable long branched plant, something like ivy! This will be what you use as the main structure. Or, you can use a branch! Providing you can twist it into a circle it'll work perfectly. Then, you can use anything else you like the look of/can find! I used conifer because I love the way it looks, its evergreen (so should keep its colour longer) and smells pretty good too. If you can get anything with berries on, than perfect! Give everything a watch and a pat try to get rid of any bugs.
           - The Decorations - Use anything you like! I used pinecone tree decorations that I've had for a couple of years, they have wire hooks so are really easy to attach to my wreath. And scraps of gold ribbon. You could use jingle bells, beads or baubles. Artificial flowers would look pretty good too.
           - The String - Common garden string would look the best, it blends in really well so you can hardly tell its there. It holds the whole thing together! You could use ribbon though if you like, thin wire would work well too.

* If you're going to forage your foliage think about what you're taking. Always leave more than you take and be sure you know what you're picking!


Start by building up your main frame, twist strands of your ivy together, tucking in the ends where you can. Don't worry too much about which way the leaves are facing, you'll have chance to mould them later down the line. Just make sure no leaves are crushed. And don't be scared to cut bits off if it doesn't quite fit, or any damaged leaves. Build up a few layers until you have a pretty thick coverage like the above.

Decide where the top of your wreath is going to be and tightly wrap string around that point. Then, going around the entire wreath, look one strand of string, pretty tightly until you get back to the top. Tie it in place. It should look just like in the second photo below. This will pull the whole wreath together. Start adding in the rest of your foliage, threading each piece from the back and using the string to hold it in place.

^^ I actually reaallly love how it looks at this stage! ^^

You should be able to arrange individual leaves (if you have them) now that its packed out a little.  Tuck them behind branches of the strong. When you're happy with how it all looks start to add in your final decorations. I didn't go too crazy with mine, but like I keep saying, do whatever you want! I wanted it to look natural and simple. Just a bit of gold (I realllly love how the dark green and gold look together) and a couple of pinecones (You can get them from Wilkinsons; here). Red or white could look super cute too. Add a final loop of string so you can hang up your finished wreath. Ta daaa!! Super cheap, super easy Christmas wreath. What do you think?

 _______________________

28 November 2014

DIY Foldable Tote

I found some stats on the gov.uk website about plastic bags (yep, I am that dull) which are pretty shocking. I mean, I know they are bad but until you see the figures you don’t realise exactly how shitty they are. In 2013 8 billion single-use bags were given out by supermarkets in the UK. EIGHT BILLION. That’s about 57,000 tonnes of waste, FROM BAGS ALONE. It’s insane. Not only are they a huge non-bio-degradable waste problem, but single-use plastic bags are a nightmare for wildlife too. It’s impossible to get exact figures but they kill thousands and thousands of seabirds, seals, turtles and other sea mammals every single year. It’s so sad! And SO preventable.

Soo, I decided to sew myself a foldable tote that I can just throw in my bag and carry with me everywhere. I read a few tutorials but actually decided to design one myself and I’m so happy with it! I think you should give it a go too.


14 October 2014

5 steps to Recycling at Home

We know how important it is to recycle, but do we honestly do enough? I know we definitely don’t (or didn't). We have made a few changes to make it super easy for us to sort our rubbish, and make sure things go where they should go! Here are the steps we took, and the ones you should think about taking too;

1. Understand– Each council/authority treats recycling different depending on the facilities they have  locally, so the best starting point do a bit of research! Most information can be found online, of course!  If you’re in the UK the Recycle Now website is a pretty good reference. Put in your postcode and it will give you information on what you can recycle at home, it also shows you a map with all the recycle points close to you! BUT, I've found it isn't 100% accurate, it had a glass point missing that is in the car-park of our supermarket; so keep your eyes peeled too. If you are lucky to have a recycle bin provided at your home check what can go in there. Our recycle bin, for example, can take paper, most plastics and metal, but it wont take glass.


2. Organise – Once you’ve found where your recycling goes, you should have a better idea how you need to split your waste up; then it’s time to get organising. You might want to get a new kitchen bin, one that's split into sections to make sorting easier (http://www.homerecycling.co.uk/ has a good collection). I decided it would work better for us to make space in a kitchen cupboard and use two canvas bags (one for our green-recycle bin, one for glass), along with our regular waste bin. Take some time out to put a system in place where you rinse your tins, jars, cans and bottles before sorting. Squash what can be squashed to make extra room. Who’s responsibility is it to do what? Someone does the dishes, the other sorts out the recycling each day? How often are you going to visit your recycling centre? It’s mainly glass that we need to take away from the house; Glass is heavy and I’m weak so we take ours whenever we go to the supermarket.
3. Do it! – You might need to make tweaks to your new routine as you go, that’s fine! The whole point of planning your recycle routine is to make it easy for you. If you can see a short cut, take it. The most important thing is to stick to a routine and don’t let things build up. Do the little bits as you go. Rinsing out a tin of beans, removing jar lids and crushing plastic bottles takes no time at all. You will barely notice the difference.

4. Re-Think – Once you’ve got your recycling routine down, you might want to start thinking about how you can reduce your waste altogether. Although plastic is widely recyclable its production takes up 8% of the worlds oil in its production so why not use a sports bottle instead of buying bottled water? Shop at your local market to avoid excess food packaging. Carry a re-useable bag. Re-use glass jars for home-made pickles and jam. Opt-out of junk mail, switch to online bank statements and bills. Take clothes to charity shops. Use yoghurt pots as plant pots. Start to compost your food scraps. There are so many little every day things we can change that all add up! We're working on having a more reduce-it mindset.

5. Bask - In your awesome environmental awareness and pass your knowledge onto friends and family.

______________________ 

11 October 2014

5 Ways to Re-Use an Old T-shirt

Oh man, there are so many ways to reuse an old t-shirt. Obviously, the first thing you should think do with used clothes is donate them to a charity shop, but if they're stained, torn or worn out you can still make use for them! Even if you get one extra use from it, it’s better than binning it straight away. If its too destroyed/stained/gross to use for anything that will be put on show, use it to clean your windows, polishing shoes or for stuffing in rag dolls. But if you just don't wear it anymore, how about trying out some of these ideas:


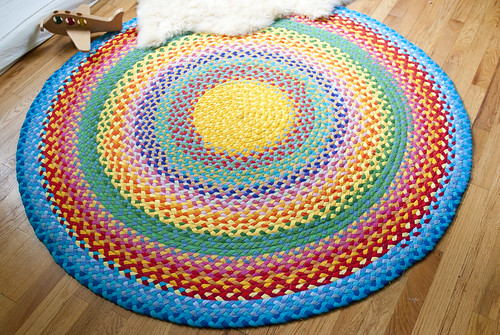
1. The Rainbow Rug - I am so in love with the way this looks, but even Meg over at Mama Liberated where I found this idea admits that its tough! It'd be perfect for a nursery or craft room thought, I think it''d be worth the stress and time you'd need to dedicate to it! (Photo via Mama Liberated)

2. Baby stuff -
          Leggings/Tights – T-shirts generally are a light jersey-stretch material which is perfect for making baby stuff. You can get templates and guides from a few places online, the one I used is here! All you’ll need is a sewing machine, thread and elastic. This method is perfect if the t-shirt is stained as you can position your stencil around these marks, or use more than one to give a two-tone look.
               Tiny Baby Hat - I found the easiest tutorial over at Small Fry, it literally takes 5minutes! I made a couple and I'm going to embroider initials onto the front, or maybe sew on a felt design? You could tie it differently, or add a pompom! There isn't anything much cuter than a baby hat.

3. Tote bag – I'm a firm believe that you can never have enough tote bags. I have loads, but I need more. There are a few tutorials around to make t-shirt tote bags, I really love this one! No sewing means it's super quick. I made it last week and I know it's going to be the perfect market shopping bag to fill with fruit and veg. This one is super cute too.


4. Braided Basket - And, my absolute favourite the braided basket! I am in love wit how this looks. It seems a little more complicated that the other ideas but I'm definitely going to give it a go! I was thinking I could make a couple of smaller versions to use as plant pot covers! I think that'd look great. (Photo via Corner Blog)

5. Pup Toys – Eva loves toys that she can destroy and I love not having to pay for those toys that she loves to destroy. There are a couple of things you can do with an old t-shirt; The easiest is to cut the whole thing into three strips and plait it, tie knots in each end or stitch them shut. The second, stitch the bottom of the t-shirt closed, put in a couple of treats and tie the arms in a knot; it keeps Eva occupied for ages. Instead of treats you could put in a tennis ball, or a squeaky toy; whatever your pup likes!

I can't wait to make some of these. Have you ever made anything from an old t-shirt? I'd love to know what you made and how it turned out!
___________________

31 August 2014

Foraging - Take 2

Last year I went on a foraging walk, and this weekend Dixon, Eva and me set out to go and find the apple trees I was shown back then! I could hardly remember where they were, we went wrong a few times. BUT, I actually learnt loads on the walk last year which meant I spotted a load of other things on the way so it totally didn't matter! I was SO happy with some of the things we found. Its still a little early in the year but we found rosemary, red clove, rose hips (that weren't ripe yet!), sea-buckthrone (which we tried, and regret not picking), a tonne of blackberries, mushrooms, horse-radish then, finally, a loooad of apples. The orchard was a lot more over-grown than it was last year, so we missed it a couple of times! Having a 6foot+ Dixon with you when you're fruit picking is definitely an advantage. 

I'll be sharing some recipes soon on what we did with our finds! Dixon really wants to make blackberry wine but it can take years to be ready to drink. We want to give cider a go too! I'm definitely going to make an apple sauce, blackberry jam and I've no idea what to do with the horseradish yet! But I'm sure I'll figure something out. Go nature!

^^ We didn't pick these because we weren't 100% sure what they were! ^^
^^ I spotted the Horseradish bush! And Dixon pulled out some of the root! ^^

________________________

21 August 2014

Bean Sprouting at Home // Vegan Blogs

I love lentil sprouts. They are seriously the best addition to any sandwiche. AND, sprouts are so good for you! When germination starts it triggers a change in the enzymes and when the sprouting starts all the vitamins and minerals within are released so your body can absorb them loads quicker. I always assumed it was difficult to sprout at home and had no idea what you could actually sprout... but last week I did a little reading and decided I should give it a go. And you should definitely do it too!

You will need:
    - The grains, seeds, nuts or beans which you want to sprout
    - A clean jar per grain type
    - Gauze for the top of your jar
    - String or an elastic band to secure your gauze

Firstly, get your jars ready. You can buy one, make one or piece one together (I used old jars, garden string and old clean tights for gauze). Rinse your grains using a sieve for a couple of minutes and take out any split/weird looking bits. Make sure your jars are freshly cleaned and sterilised then add your grains. Remember they are going to swell up whilst they soak and when they start to sprout they will fill up the space quickly. I'd say never fill your jar more than 1/5. (My lentil sprouts seriously took over the entire jar within a couple of days).

Then, fix your gauze in place using string or an elastic band and top up half way with room temperature water. You then need to leave them to soak for a while; I found this super helpful sprouting spectrum chart which tells you how long you need to soak and how long you'll have to wait for them to sprout. I soaked mine for a few hours longer then it suggested, just to make sure.

^^ After the overnight soaking! Pretty swollen ^^

Once they're soaked, empty out the water and rinse a couple of times. Then you'll need to find somewhere to prop them on a 45degree angle and out of direct sunlight. I found that a bread-loaf tin worked perfectly. Every morning and every night give them a full rinse, some people seem to vary on how often to rinse your sprouts; but I thought I'd rather be safe than sorry. Sprouting can harbour bad bacteria so be super careful. Repeat the rinsing until your sprouts are big and ready!


What I learnt: For my first attempt I used green lentil and mung beans. The lentils started within a day or two of soaking. I filled my jar about 1/8th with lentils and it still completely filled the jar by the time they sprouted. I ended up with a HUGE bowl of them! Way too many actually... I made a lot of sandwiches!! The mung beans didn't swell anywhere near as much compared to the lentils, they also took an extra day to sprout compared with the green lentils but took up no where near as much space. They're good cooked; in stir-fries, duh!


__________________
Lifestyle Blog // Nature, DIY, Coffee // By The Lock Lifestyle Blog // Nature, DIY and Coffee // By The Lock